Custom filebrowser for Unity

I had a project recently, that used the WinForms filebrowser plugin for Unity. Then I was tasked to port that project to android and ran into issues with the filebrowser. I could of used one of the premade filebrowsers from Asset store, but they were all too advanced for my needs. So I decided to make simple version myself. Feel free to use it for whatever you need it for.

using UnityEngine;
using UnityEngine.UI;
using System.IO;
using System.Collections;
using System.Collections.Generic;

public class FileSelector : MonoBehaviour
{
    [SerializeField]
    private UnityEngine.UI.InputField m_inputField;

    [SerializeField]
    private GameObject m_fileBrowser;

    [SerializeField]
    private VerticalLayoutGroup m_layoutGroup;

    [SerializeField]
    private Scrollbar m_verticalScroll;

    [SerializeField]
    private UnityEngine.UI.Button m_folderButton;

    [SerializeField]
    private UnityEngine.UI.Button m_upperFolderButton;

    //our current location
    private string m_curFolderPath;


    private void Start()
    {
        Initialize();
    }

    private void Initialize()
    {
        //Init the file browser, show root folder based on platform.
#if UNITY_STANDALONE
        m_curFolderPath = @"C:\";
#elif UNITY_ANDROID
        m_curFolderPath = @"storage/";
#endif
        UpdateFolderView();
    }

    //refresh folder view, show subfolders of the current folder
    private void UpdateFolderView()
    {
        print(m_curFolderPath);
        m_inputField.text = m_curFolderPath;
       
        //clear view
        for(int i = 0; i < m_layoutGroup.transform.childCount; i++)
        {
            Destroy(m_layoutGroup.transform.GetChild(i).gameObject);
        }
        m_upperFolderButton.enabled = false;
        //get new subfolders
        StartCoroutine("GetSubFolders");
        StartCoroutine("GetTextFilesInFolder");
    }

    private IEnumerator GetSubFolders()
    {
        string[] subFolders = Directory.GetDirectories(m_curFolderPath);

        int index = 0;
        while(index < subFolders.Length)
        {
            print(subFolders[index]);
            CreateFolderButton(subFolders[index]);
            index++;
            yield return null;
        }
        
        yield return null;

        m_verticalScroll.value = 1;
        m_upperFolderButton.enabled = true;
    }

    private IEnumerator GetTextFilesInFolder()
    {
        List<string> txtFiles = new List<string>();

        txtFiles.AddRange( Directory.GetFiles(m_curFolderPath, "*.txt") );

        int index = 0;
        while (index < txtFiles.Count)
        {
            print(txtFiles[index]);
            CreateFileButton(txtFiles[index]);
            index++;
            yield return null;
        }

        yield return null;

        m_verticalScroll.value = 1;
        m_upperFolderButton.enabled = true;
    }

    public void MoveUp()
    {
        m_curFolderPath = Directory.GetParent(m_curFolderPath).FullName;
        UpdateFolderView();
    }

    //Creates buttons for folders
    private void CreateFolderButton(string folderPath)
    {
        GameObject button = GameObject.Instantiate(m_folderButton.gameObject);
        button.transform.SetParent(m_layoutGroup.transform);
        button.GetComponent<RectTransform>().localScale = Vector3.one;
        button.transform.GetChild(0).GetComponent<UnityEngine.UI.Text>().text = Path.GetFileName(folderPath);

        //bind event to button click, changes currentpath to clicked folder
        button.GetComponent<UnityEngine.UI.Button>().onClick.AddListener(() => { m_curFolderPath = folderPath; UpdateFolderView(); });
    }

    //Creates buttons for files
    private void CreateFileButton(string filePath)
    {
        GameObject button = GameObject.Instantiate(m_folderButton.gameObject);
        button.transform.SetParent(m_layoutGroup.transform);
        button.GetComponent<RectTransform>().localScale = Vector3.one;
        button.transform.GetChild(0).GetComponent<UnityEngine.UI.Text>().text = Path.GetFileName(filePath);
        button.GetComponent<UnityEngine.UI.Button>().onClick.AddListener(() => { m_inputField.text = filePath; });
    }
}

Here are few images on how to set it up. Buttons are just standard buttons that are made into prefabs, their functionality is set in the code.


Loot/Item system

I made a Loot and Item system earlier and thought it was brilliant so I decided to share it. Lets get into it.

We need a ItemDatabase class that holds data of all items. We have a basic Item class that contains data of a single item. Then we have a constructor that deep copies our item, so holding multiple same items would work and different same items would act as individual instead of being a shallow copies of the main one.

ItemDatabase has two static methods that returns you item based on name or id.

using UnityEngine;
using System.Collections;
using System.Collections.Generic;

public class ItemDatabase : MonoBehaviour
{
	public List<Item> allItems;
	public static List<Item> items;

	[System.Serializable]
	public class Item
	{
		public string itemName = "";
		public int itemID = 0;
		public int dmg = 0;
		public int armor = 0;
		public Sprite icon;

		public enum Type
		{
			equipment,
			other
		}

		public enum Rarity
		{
			common,
			uncommon,
			rare,
			epic
		}

		public Type type;
		public Rarity rarity;

		public Item()
		{

		}

		public Item(Item itemCopy)
		{
			itemID = itemCopy.itemID;
			icon = itemCopy.icon;
			itemName = itemCopy.itemName;
			dmg = itemCopy.dmg;
			armor = itemCopy.armor;
		}
	}

	private void Awake()
	{
		InitItems ();
	}

	private void InitItems()
	{
		items = allItems;
	}

	public static Item GetItemByName(string itemName)
	{
		for( int i = 0;i<ItemDatabase.items.Count;i++ )
		{
			if(ItemDatabase.items[i].itemName == itemName)
			{
				return ItemDatabase.items[i];
			}
		 }
		 return null;
	}

	public static Item GetItemById(int id)
	{
		for( int i = 0;i<ItemDatabase.items.Count;i++ )
		{
			if(ItemDatabase.items[i].itemID == id)
			{
				return ItemDatabase.items[i];
			}
		}
		return null;
	}
}

Then we have a Loot class. This is attached to anything that drops loot. Loot class spawns a loot prefab which holds the dropped item, so player can pick it up. In Loot class you can specify which drop % the items have and what items the enemy drops. When enemy dies we call DropItems method. In that method we basically roll a dice for every item drop possibility that the enemy has. Then we check on which gap the roll landed into.

For example we have a loot table like this:

Sword                   25%
Staff                      15%
Potion                   45%
Nothing                 55%

Total                     140%

We first add all those drop percentages together and get a total value. The value of 140. Now we need to take all the % values from 140 and add them together to get the maximum value. So 25% from 140 is 35 then we add 15% to it which is 21 and so on, until we get the maximum value of 196.

25%            35
15%            21
45%            63
55%            77

140%          196

Now when we roll between 0 and maximum value, we can check if roll land between 0 and 35 if it does we give player a sword. Next item to check is a staff, if player rolled between 35 and 56 we give player a staff. Now if player rolls 145 for example we don’t give him anything as the roll landed between nothing gap etc.

using UnityEngine;
using System.Collections;

public class Loot : MonoBehaviour
{
	private Transform m_transform;
	private int m_amountToDrop;

	public NewPickUp pickUpPrefab;
	public int minAmountOfDrops, maxAmountOfDrops;

	[System.Serializable]
	public class DropItem
	{
		public bool empty;
		public string itemName;
		public int amount;
		public bool randomizeAmount;
		public int min,max;
		public float dropChance;
	}

	public DropItem[] itemsToDrop;

	private float maximumPropability;

	private void Start()
	{
		m_transform = transform;
		m_amountToDrop = Random.Range( minAmountOfDrops,maxAmountOfDrops );
		InitItemChances ();
	}

	/// <summary>
	/// Initializes drop chances
	/// </summary>
	private void InitItemChances()
	{
		for( int i = 0;i<itemsToDrop.Length;i++ )
		{
			if(i != 0)
			{
				itemsToDrop[i].dropChance += itemsToDrop[i - 1].dropChance;
			}
		}

		maximumPropability = itemsToDrop[itemsToDrop.Length - 1].dropChance;

		for( int i = 0;i<itemsToDrop.Length;i++ )
		{
			int temp = System.Convert.ToInt32(((maximumPropability / 100) * itemsToDrop[i].dropChance));
			itemsToDrop[i].dropChance = (float)temp;
		}

		maximumPropability = itemsToDrop[itemsToDrop.Length - 1].dropChance;
	}

	/// <summary>
	/// Drops the items.
	/// </summary>
	public void DropItems()
	{
		for( int i = 0;i<m_amountToDrop;i++ )
		{
			int rnd = Random.Range(0,(int)maximumPropability + 1);
			DropItem droppedItem = ChooseItem(rnd);

			if( !droppedItem.empty )
			{
				SpawnItem(droppedItem);
			}
		}
	}

	/// <summary>
	/// Spawns item.
	/// </summary>
	/// <param name="droppedItem">Dropped item.</param>
	public void SpawnItem(DropItem droppedItem)
	{
		NewPickUp temp = GameObject.Instantiate( pickUpPrefab,m_transform.position,Quaternion.identity ) as NewPickUp;

		temp.itemName = droppedItem.itemName;

		if(droppedItem.randomizeAmount)
			temp.amount = Random.Range(droppedItem.min,droppedItem.max);
		else
			temp.amount = 1;

		temp.SetUp();
	}

	/// <summary>
	/// Choose item to drop by its drop chance
	/// </summary>
	/// <returns>The item.</returns>
	/// <param name="rnd">Random.</param>
	public DropItem ChooseItem(int rnd)
	{
		int maxVal = (int)itemsToDrop [itemsToDrop.Length - 1].dropChance;

		if(rnd == maxVal)
			rnd -= 1;

		int index = 0;
		while (itemsToDrop[index].dropChance <= rnd)
		{
			index++;
		}
		return itemsToDrop [index];
	}
}

Here is the pickup class. This class is spawned into the world as a prefab. If player steps on it we take the item to our inventory if we have space.

using UnityEngine;
using System.Collections;

public class NewPickUp : MonoBehaviour
{
	public string itemName;
	public int amount;

	private void Start()
	{
		SetUp();
	}

	public void SetUp()
	{
		Item item = ItemDatabase.GetItemByName( itemName );

		if(item != null)
		{
			GetComponent<SpriteRenderer>().sprite = item.icon;
		}
	}

	private void OnTriggerEnter2D(Collider2D col)
	{
		if (col.GetComponent<Inventory> ())
		{
			Inventory inv = col.GetComponent<Inventory> ();

			//We need to create deep copy from the item, so we can have multiple same items.
			ItemDatabase.Item newItem = new ItemDatabase.Item(item);

			if(newItem != null)
			{
				for(int i = 0;i<amount;i++)
				{
					if(!inv.IsFull(newItem))
					{
						inv.AddItem(newItem);
						amount--;
					}
				}
			}

			if(amount == 0)
			{
				Destroy(gameObject);
			}
		}
	}
}

I didn’t include my Inventory class, because it’s mostly about how the Inventory UI works. It contains 2 lists of itemslots. One for equipped items and one for inventory itself. Then you just do some kind of equipping system and handle all the checks such as; if your high enough level for the item, add and remove stats etc etc.

Thanks for reading and hope this helps someone.

SaveGame system in Unity

Okay so you have a nice game ready, with some nice content and characters. Now you might think; “What if I want to stop playing my game and continue where I left off?”. Well then you need somekind of savesystem.

Now we all know that Unity has it’s own savesystem: Playerprefs. You can save variables there and then take them out when needed. There is a one big problem in Unitys Playerprefs thought. It’s made in XML. While XML is a nice human understandable way of saving data into a file, it is slow. And if your game is a big one with a lot of content, monsters and items in it, it will take ages to save or load a game data from XML file. You can however do it pretty fast by writing raw byte data to the file.

First we need to know where to place our savefiles. Savefiles cannot be placed into Assets folder, because when you play the game Unity only loads data from there, so you cannot write anything into your savefiles. They need to be placed into StreamingAssets folder. In Unitys docs it says that if a file is in StreamingAssets folder, you can write to it and read from it. If you don’t have this folder, just make it under your Assets folder. (Assets/StreamingAssets)

So first lets make a SaveData class that holds/saves all the variables that need to be saved. We are going to use only a few parameters in this project, but you can add more as you need them.

We are going to use C# serialization interface ISerializable. This adds a new method GetObjectData, which is used to serialize the data.

Then we use methods Serialize and DeSerialize to write our data into the file and getting it from the file.

We are using some basic encryption while writing/reading from the file. This is just to make our savedata a little bit harder to change from the file.

using UnityEngine;
using System.Collections;
using System.IO;
using System.Runtime.Serialization;
using System.Runtime.Serialization.Formatters.Binary;
using System.Collections.Generic;

[System.Serializable]
public class SaveData : ISerializable
{
	public string path = "";
	public string currentLevel = "";
	public float time = 0;
	public int difficulty = 0;

	#region ISerializable implementation

	public void GetObjectData (SerializationInfo info, StreamingContext context)
	{
		info.AddValue ("currentLevel", currentLevel);
		info.AddValue ("time", time);
		info.AddValue ("difficulty", difficulty);
	}

	#endregion


	public SaveData(SerializationInfo info, StreamingContext context)
	{
		currentLevel = (string)info.GetValue ("currentLevel", currentLevel.GetType ());
		time = (float)info.GetValue ("time", time.GetType ());
		difficulty = (int)info.GetValue ("difficulty", difficulty.GetType ());
	}
	
	public SaveData()
	{
		
	}
	
	public void Serialize()
	{
		BinaryFormatter bf = new BinaryFormatter();
		MemoryStream ms = new MemoryStream();
		bf.Serialize(ms, this);

		string base64 = System.Convert.ToBase64String(ms.GetBuffer());

		Encryption e = new Encryption ();

		base64 = e.Encrypt (base64);

		File.WriteAllText(path, base64);
		ms.Dispose();
	}
	
	public SaveData DeSerializeSaveData()
	{
		SaveData data = null;
		using (FileStream fileStream = new FileStream (path, FileMode.OpenOrCreate, FileAccess.Read))
		{
			BinaryFormatter bf = new BinaryFormatter();

			StreamReader reader = new StreamReader(path);
			string base64 = reader.ReadToEnd();

			Encryption e = new Encryption ();
			
			base64 = e.Decrypt (base64);

			MemoryStream ms = new MemoryStream( System.Convert.FromBase64String(base64) );
			data = (SaveData) bf.Deserialize(ms);

			ms.Dispose();
		}
		return data;
	}
}

We are going to add small encryption into our savedata. We have 246 bit key that is needed along with vector to get our data out. If someone tries to open it with different key he wont get the right data. Now it’s never good to use a single key. Instead what you want is to have random keys and change the key every time. But this is just a small test anyways so we are not going to bother with it.

using System.Security.Cryptography;
using System.IO; 
using System;
using System.Text;
using UnityEngine;

public class Encryption 
{
	//We are using 246 bit key 
	private static string key = "V4uYUB858Ep53P3hgHbk9RLksKn236B7"; 
	private static byte[] vector = {114, 214, 253, 108 , 79, 253, 62, 45, 175, 11, 85, 47, 149, 177, 94, 243}; 
	private ICryptoTransform encryptor, decryptor;
	private UTF8Encoding encoder; 

	public Encryption() 
	{ 
		RijndaelManaged rm = new RijndaelManaged();
		encryptor = rm.CreateEncryptor(Convert.FromBase64String (key),vector);
		decryptor = rm.CreateDecryptor(Convert.FromBase64String (key),vector);

		encoder = new UTF8Encoding(); 
	}

	public string Encrypt(string unencrypted) 
	{ 
		return Convert.ToBase64String(Encrypt(encoder.GetBytes(unencrypted))); 
	}

	public string Decrypt(string encrypted) 
	{ 
		return encoder.GetString(Decrypt(Convert.FromBase64String(encrypted))); 
	}

	public byte[] Encrypt(byte[] buffer) 
	{
		return Transform(buffer, encryptor); 
	} 

	public byte[] Decrypt(byte[] buffer) 
	{
		return Transform(buffer, decryptor);
	} 

	protected byte[] Transform(byte[] buffer, ICryptoTransform transform) 
	{
		MemoryStream stream = new MemoryStream(); 

		using (CryptoStream cs = new CryptoStream(stream, transform, CryptoStreamMode.Write)) 
		{ 
			cs.Write(buffer, 0, buffer.Length); 
		}

		return stream.ToArray(); 
	} 
}

encryptedsavedata
The savedata looks something like this from the file, if opened with notepad.

Now we have savedata class done. We need to add manager that controls the saving and loading of data.

First we need to Initialize our savefiles. This is done when the game starts. In the InitSaveDatas method we search our StreamingAssets folder for savefiles. We discard everything else, including meta files. Now if we don’t have enought save files or none at all we simply just create empty ones. If we had savefiles we deserialize them into our savedata list.

Now lets create a methods for Saving and Loading the game. In game player has to select a save file before playing the game. That file will be our CurrentSaveData which is used to store all variables. Now my game has a LevelManager that is used to store important data and control entities in a level.  In SaveGame method we add all data from LevelManager to savedata and write the data into the file. In LoadGame method we read all data from the file and pass it to the LevelManager.

Now how do we use these? Well it’s quite simple. Just call for SaveManager.SaveGame whenever you wish to save the game. And call for SaveManager.LoadGame when you want to load gamedata from the file. (when player selects a save file).

And there you go. Now just add more data to it, like player position, levelprogress, currency, owned items, etc.

using UnityEngine;
using System.Collections;
using System.Collections.Generic;
using System.IO;
using System.Runtime.Serialization;
using System.Runtime.Serialization.Formatters.Binary;

public static class SaveManager 
{
	private const int SAVE_AMOUNT = 3;
	
	public static SaveData CurSaveData
	{
		get;
		set;
	}
	
	private static List<SaveData> m_allSaveDatas = new List<SaveData>();
	
	public static List<SaveData> AllSaveDatas 
	{
		get
		{
			return m_allSaveDatas;
		}
		set
		{
			m_allSaveDatas = value;
		}
	}
	
	/// <summary>
	/// Inits the save datas.
	/// Call in the game start once.
	/// </summary>
	public static void InitSaveDatas()
	{
		m_allSaveDatas.Clear ();
		
		string[] files = Directory.GetFiles(Application.streamingAssetsPath + @"\");
		
		if(files.Length == 0)
		{
			for( int i = 0; i < SAVE_AMOUNT; i++ )
			{
				FileStream stream = File.Create (Application.streamingAssetsPath + @"\" + "SaveData" + i + ".save");
				stream.Close();
				
				//create new empty save file
				SaveData data = new SaveData();
				data.path = Application.streamingAssetsPath + @"\" + "SaveData" + i + ".save";
				data.currentLevel = "";
				data.difficulty = 1;
				data.time = 0;
				
				data.Serialize();
				m_allSaveDatas.Add(data);
			}
		}
		else
		{
			for( int i = 0; i < files.Length; i++ )
			{
				if(files[i].Contains(".save") && !files[i].Contains(".meta"))
				{
					SaveData data = new SaveData();
					data.path = files[i];
					data = data.DeSerializeSaveData();
					data.path = files[i];
					m_allSaveDatas.Add(data);
				}
			}
		}
	}
	/// <summary>
	/// Save the game, pass all data from game to savefile
	/// </summary>
	public static void SaveGame()
	{
		if(CurSaveData != null)
		{
			CurSaveData.time = LevelManager.totalTime;
			CurSaveData.difficulty = LevelManager.DifficultyLevel;
			CurSaveData.currentLevel = Application.loadedLevelName;
			
			CurSaveData.Serialize();
		}
	}
	/// <summary>
	/// Load the game, pass all data from savefile to values in game.
	/// </summary>
	public static void LoadGame()
	{
		if(CurSaveData != null)
		{
			LevelManager.totalTime = SaveManager.CurSaveData.time;
			LevelManager.DifficultyLevel = SaveManager.CurSaveData.difficulty;
		}
	}
}

Small warning!
Encryption key might not work. I just took it from random generator and the program haven’t been tested with it. (I didn’t want to use the key our game uses)

Palvelutehtävissä toimiminen kurssin palautus

Valitsin jälkimmäisen tehtävän, mikä oli 3d peli alueen luominen ja 1st tai 3rd person controllerin tekeminen. Engineksi valitsin Unityn versio 4.6.

Tein aluksi camera controlli scriptin ja pelaajan liikkumis scriptin. (Source alla)

Kamera koodissa on kaksi moodia. Siinä joko kameran rotaatio vaihtaa pelaajan rotaatiota tai se ei vaikuta ollenkaan.
Kameraa voi zoomata sisään hiiren rullaa käyttäen. Kamera seuraa pelaajan y akselin liikettä hieman jäljessä, jolloin syntyy hieno smooth effekti, kun hyppää. Kamera ei myöskään mene seinien tai terrainin sisään, vaan siirtää omaa paikkaansa sen mukaan.

using UnityEngine;
using System.Collections;

public class CameraController : MonoBehaviour {

	private Transform m_transform;
	public Transform playerTransform;

	private float m_x;
	private float m_y;

	public float xSpeed;
	public float ySpeed;

	private Vector3 m_angles;

	public float distanceMin, distanceMax;

	public float distance = 0;

	private Vector3 velocity;

	public float followSpeed;

	private void Awake()
	{
		m_transform = transform;

		m_angles = m_transform.eulerAngles;
		m_x = m_angles.y;
		m_y = m_angles.x;
	}

	public enum Mode
	{
		rotatePlayer,
		ignorePlayer
	};

	[SerializeField]
	private Mode cameraMode;

	private void FixedUpdate ()
	{

		m_x += Input.GetAxis("Mouse X") * xSpeed;
		m_y -= Input.GetAxis("Mouse Y") * ySpeed;

		Quaternion rotation = Quaternion.Euler(m_y, m_x, 0);

		m_transform.rotation = rotation;

		distance = Mathf.Clamp(distance - Input.GetAxis("Mouse ScrollWheel")*5, distanceMin, distanceMax);
		Vector3 desiredPos = rotation * new Vector3 (0, 0, -distance) + playerTransform.position;
                // Smooth y axis to slowly follow player.
		float smoothY = Mathf.SmoothDamp(m_transform.position.y, desiredPos.y,ref velocity.y, followSpeed);
		m_transform.position = new Vector3(desiredPos.x,smoothY,desiredPos.z);

		if(playerTransform != null && cameraMode == Mode.rotatePlayer)
			playerTransform.localEulerAngles = new Vector3(playerTransform.localEulerAngles.x, m_transform.localEulerAngles.y, playerTransform.localEulerAngles.z);

		RaycastHit hit;
		if(Physics.Raycast(playerTransform.position,(m_transform.position - playerTransform.position).normalized,out hit,(distance <= 0 ? -distance : distance)))
		{
			m_transform.position = hit.point - (m_transform.position - hit.point).normalized * 1.2f;
		}

	}
}

Player movement script

Liikkumis scriptissä on kaksi moodia, keyboard turn, joka on tarkoitettu käytettäväksi kameran ignore moodin kanssa ja normaali moodi, mikä on tarkoitettu käytettäväksi silloin, kun kameran rotaatio vaikuttaa myös pelaajan rotaatioon.

using UnityEngine;
using System.Collections;

public class Movement : MonoBehaviour {

	public bool AllowMovement;
	public float speed;

	private Rigidbody m_rigidbody;
	private Vector3 m_moveDirection = Vector3.zero;
	private Transform m_transform;
	private bool m_isGrounded;
	private float m_yVelocity;

	[SerializeField]
	private float m_fallingSpeed;

	[SerializeField]
	private float m_jumpSpeed;

	[SerializeField]
	private LayerMask m_layerMask;

	public bool keyboardTurnMode;
	public float turnSpeed;

	void Awake()
	{
		m_transform = transform;
		m_rigidbody = rigidbody;
	}

	void FixedUpdate()
	{
		if(AllowMovement)
			DoMovement();
	}
	/// <summary>
	/// Do player movement
	/// </summary>
	void DoMovement()
	{
		m_rigidbody.velocity = Vector3.zero;
		m_rigidbody.velocity = Vector3.zero;
		Vector3 dist = m_moveDirection;

		if(keyboardTurnMode)
		{
			m_transform.Rotate(0,Input.GetAxis("keyboardTurn") * turnSpeed,0);

		}
		RaycastHit ray;
		if(Physics.SphereCast(m_transform.position, .5f,Vector3.down,out ray,.5f,m_layerMask))
			m_isGrounded = true;
		else
			m_isGrounded = false;

		if(Input.GetKeyDown(KeyCode.Space) && m_isGrounded)
		{
			m_yVelocity = m_jumpSpeed;
		}
		if (m_isGrounded && m_yVelocity < 0)
		{
			m_yVelocity = -0.1f;
		}
		else
		{
			m_yVelocity += Physics.gravity.y * m_fallingSpeed * Time.deltaTime;
		}

		dist.y = m_yVelocity * Time.deltaTime;

		m_moveDirection = new Vector3(Input.GetAxis("Horizontal"),0,Input.GetAxis("Vertical"));
		m_moveDirection = m_transform.TransformDirection(m_moveDirection);
		m_moveDirection *= speed;

		m_rigidbody.velocity = dist;
	}
}

Scriptin pätkien jälkeen, Importtasin Unityn default terrain assetit. Niissä tulee mukana muutama tekstuuri, default puita ja muutama erilainen ruoho.

Tein custom materiaalin, joka mahdollistaa normal mappien käytön terrainissa.

terrainmat

Tein normal mapit terrainin default tekstuureista, ja painttasin terrainin.

scene3

Lisäsin valaistuksen ja laitoin sen käyttämään realtime varjoja ja lisäsin muutaman puun.

scene2

Lopuksi lisäsin peliin muilta oppilailta saatuja 3d malleja. Lisäsin pelaajaksi, jonkun tekemän kaktuksen.

scene

Laitoin kaktukselle erään toisen oppilaan tekemän haulikon päähän. Lisäsin peliin aikaisemmin tekemäni ampumis scriptin ja tein ammukset käytteän trail rendereriä.

jaa

Lataa projekti täältä: Project files

Inventory system in unity c#

In the inventory I want that we have a list of items and we can instantiate them with buttons or number keys (each key representing a right index in our list) and a way to drop stuff from our inventory and add stuff to it. Lets start. First things first. We will be using lists in this code so we need to add “using System.Collections.Generic;” to the start if the code.

using UnityEngine;
using System.Collections;
//Required if you will be using lists and we will.
using System.Collections.Generic;

public class Inventory : MonoBehaviour {

}

After that let’s think a bit what will we need. First off we need a class which we will store in to the list we will be making. Let’s go ahead and make a Weapon class that will hold all sub weapons we might do. First we want to make weapontypes. Enums work great with this and it’s a great way to check if some weapon is right type and stuff. 1st enum will be 1 second will be 2 and so on. Then we can add texture to specific weapons and use it later in inventory. And last we might want to add dmg float to this class as every weapon will be doing dmg.

using UnityEngine;
using System.Collections;

public class Weapon : MonoBehaviour {

	public enum WeaponType
	{
		Sword,
		Gun
	};

	public WeaponType weaponType;
	public Texture weaponLogo = null;
	public float dmg = 0;
}

Now that we have a class for weapon we can jump back to the Inventory script. Let’s go ahead and add a list that will hold our weapons.

public List<Weapon> myWeaponList = null;

Then we need to be able to see which weapon we have currently selected(equipped) so lets make a variable for that.

public List<Weapon> myWeaponList = null;
public Weapon currentWeapon = null;

Alright now we have variables set so let’s go ahead and test them. As we want every weapon in our inventory to present box in our UI and to be able to change weapon by clicking one we need to make OnGUI function. We need to add rect which is 2d position on the screen with values “Position X, Position Y, Width, Height”.

public List<Weapon> myWeaponList = null;
public Weapon currentWeapon = null;
//We set all the values in a rect to 0 by default and we will set them in the inspector. After that let's test out how it works.
public Rect guiAreaRect = new Rect(0,0,0,0);

void OnGUI()
{
	//begin guilayout area
    GUILayout.BeginArea(guiAreaRect);
	//begin vertical group. This means that everything under this will go from up to down
    GUILayout.BeginVertical();
	//loop throught the list of out weapons
    foreach(Weapon weapon in myWeaponList)
    {
		//check if we find something
        if(weapon != null)
        {
			//Do a gui button for every weapon we found on our weapon list. And make them draw their weaponLogos.
            if(GUILayout.Button(weapon.weaponLogo,GUILayout.Width(50),GUILayout.Height(50)))
            {
				//if we clicked the button it will but that weapon to our selected(equipped) weapon
                currentWeapon = weapon;
            }
        }
    }
	//We need to close vertical gpr and gui area group.
    GUILayout.EndVertical();
    GUILayout.EndArea();
}
}

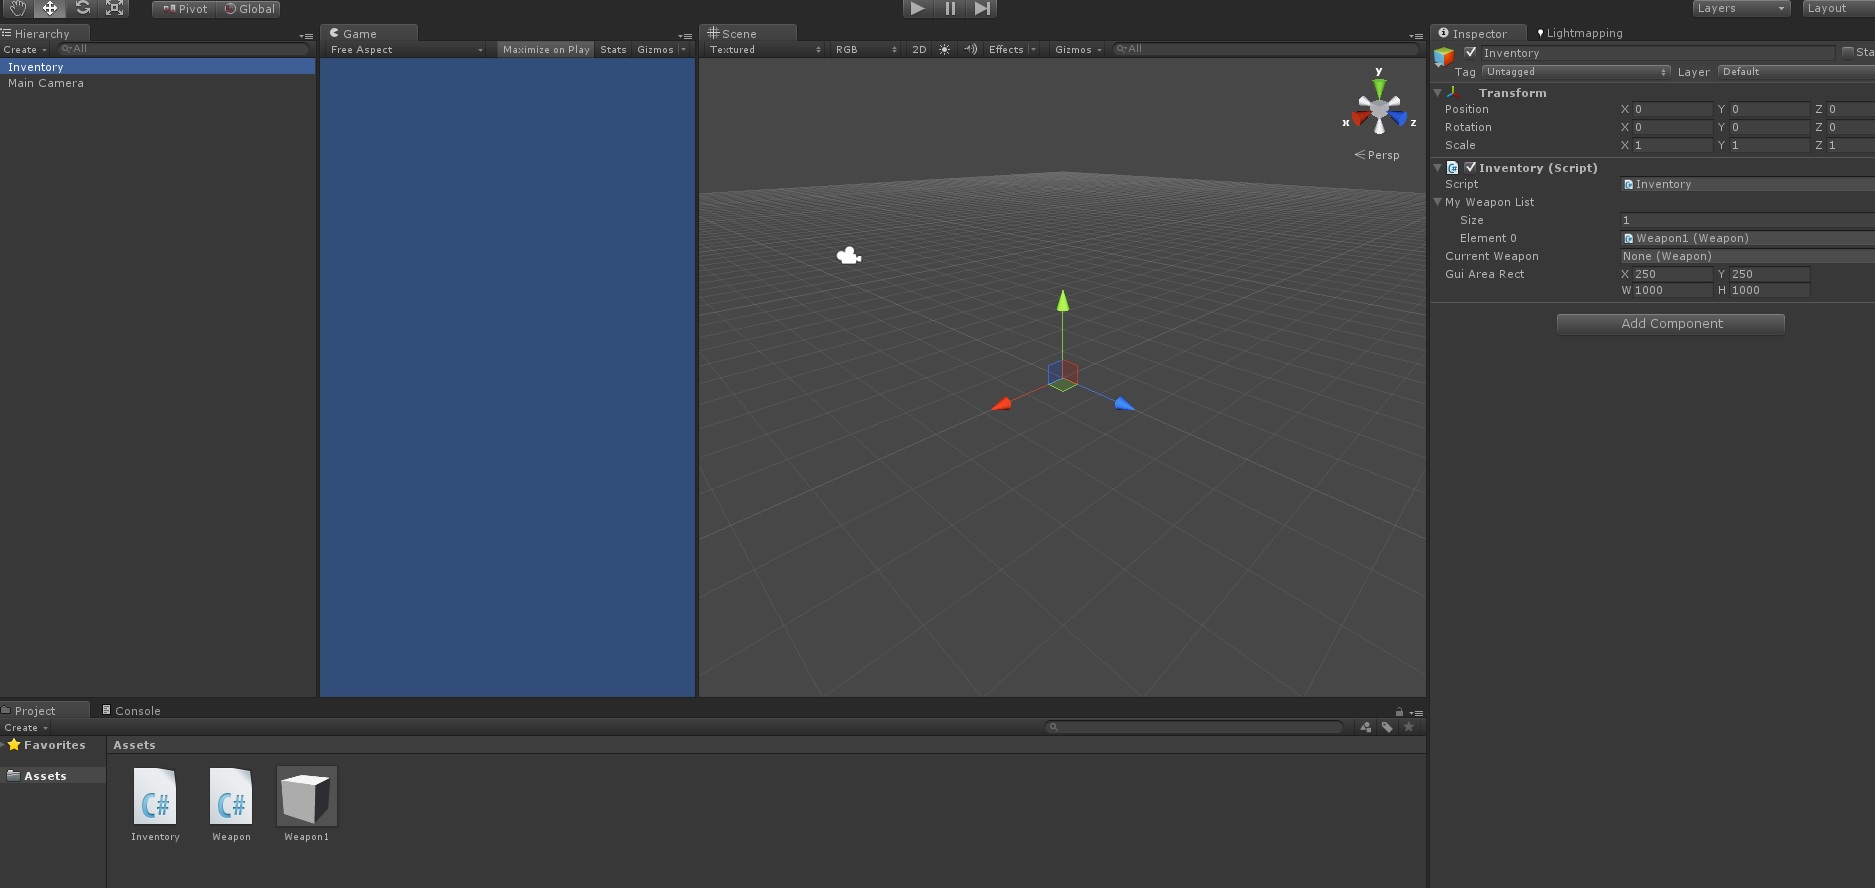
Then in editor side we click “GameObject” tab and “Create Empty” and attach our script to it. Then we set up our values in the inspector to the script. Now we need to make weapon to add to the Inventory, so let’s make GameObject again but this time let’s do a cube. Then we put weapon script to that cube. Now we drag that cube from Hierarchy to Assests folder and make it a prefab by doing so. Let’s name it to “Weapon1”. And then drag it to the Inventory.

MakingInventory
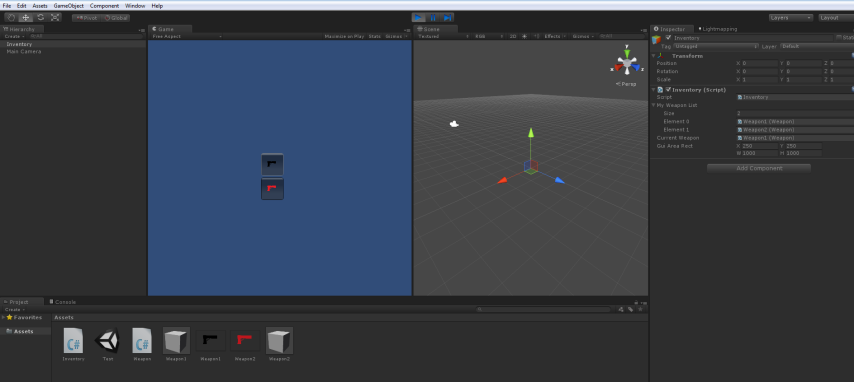
Now if we hit play it will show us one gui box presenting our weapon in our inventory. Now we add a texture (Just make one with paint or download from google) to Weapon1 and make another cube and make it “Weapon2”. Attach weapon script to that one too, make it a prefab and  drag it to our weapon list. Put different texture to it and then we click play again. We will see that there is texture in the box that is the texture from our Weapon1 and there will be second box with differend texture from weapon2. Now if we click that button we see that nothing will happen. Well there still happens something. If we press the button it will put that weapon in to our currentWeapon variable in our Inventory representing that that one weapon have been selected from the list.

InventoryTest2

We can add debug log aswell to print out current weapon


if(GUILayout.Button(weapon.weaponLogo,GUILayout.Width(50),GUILayout.Height(50)))
{
	//if we clicked the button it will but that weapon to our selected(equipped) weapon
	currentWeapon = weapon;
	Debug.Log(currentWeapon);
}

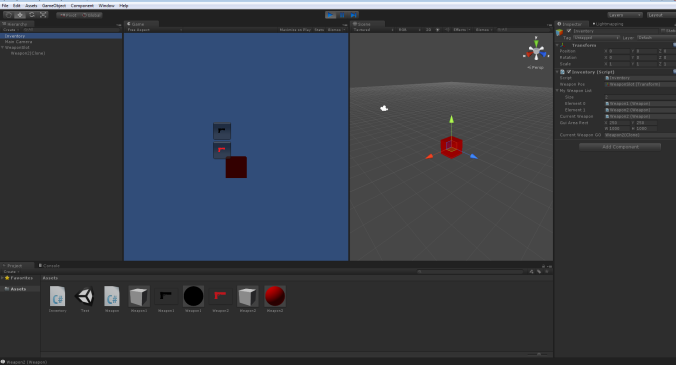
Now we have all these weapons in our inventory list, but they aren’t going to do anything if they just stay in the inventory, so we need a way to get them to the game and Instantiate them to our player’s hand for example. So we are going to go ahead and make empty gameobject again and put/attach that to anything anywhere in the screen. We will use this spot’s position to know where to spawn our weapon. Let’s make a new function let’s call it ChangeWeapon we need to pass it Weapon type variable which will be our new weapon to equip.

public void ChangeWeapon(Weapon newWeapon)
{

}

Now we need new variable that will represent our current weapon’s gameobject. And one that will have our weaponslots transform.

public Transform weaponPos = null;
public GameObject currentWeaponGO = null;

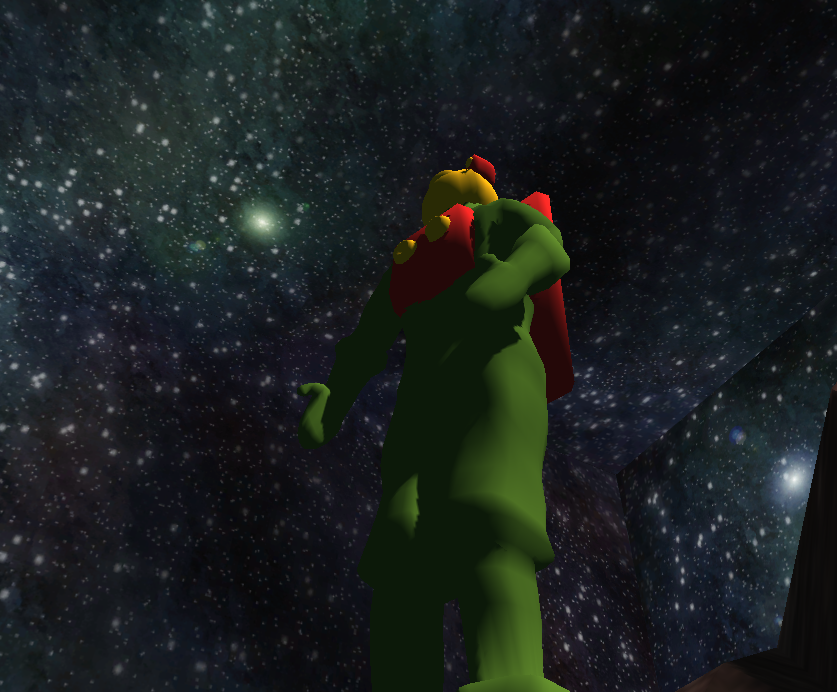
Then we can jump back to our function and actually do something. Firstly we need to make sure that there is no weapon already in our weaponslot. So let’s go ahead and make a check if there is a weapon and if there is destroy it. Now that we are sure that there is nothing in our weapon slot we can instantiate our currentweapon to our weaponslot. Then we set it to be a child of our weaponslot to make sure that it sticks along when we move our character. And depending which way our weapon is in prefab we need to turn it around to make sure it has right rotation.

public void ChangeWeapon(Weapon newWeapon)
{
	//if we have weapon destroy it
	if(currentWeaponGO != null)
		Destroy (currentWeaponGO);

	//instantiate new weapon prefab to game. it needs to be casted to be a gameobject
	currentWeaponGO = GameObject.Instantiate(newWeapon.gameObject,Vector3.zero,Quaternion.identity) as GameObject;
	//set weaponslot to be the parent of the weapon
	currentWeaponGO.transform.parent = weaponPos;
	//set weapon position to weaponslot position
	currentWeaponGO.transform.position = weaponPos.position;
	//turn weapon so it has right rotation ( not always needed )
	//currentWeaponGO.transform.localRotation = Quaternion.Euler(75f,75f,75f);
}

Now we call this function in OnGUI and when we have clicked the button.

if(GUILayout.Button(weapon.weaponLogo,GUILayout.Width(50),GUILayout.Height(50)))
{
	//if we clicked the button it will but that weapon to our selected(equipped) weapon
	currentWeapon = weapon;
	//we pass this function the value from our clicked button's weapon.
	ChangeWeapon(weapon);
	Debug.Log(currentWeapon);
}

InventoryTest3

Now let’s add another way to spawn or currentWeapon to weaponslots. In the start I said that we want to be able to spawn our currentWeapon with numbers. Number one representing first index in our list and so on. So let’s jump into it. Firstly we need a list about keys we will use. Unity holds all keyboard input keys in keycode enums. For example Keycode.Alpha1 is button 1 in keyboard. So let’s make a list about the keys we need. Let’s just add 5 first keys now in the start. We can add more later on if we need more for our inventory.

List<KeyCode> numberss = new List<KeyCode>{ KeyCode.Alpha1, KeyCode.Alpha2, KeyCode.Alpha3,
		KeyCode.Alpha4, KeyCode.Alpha5};

Now we need to make an update function to check out if we press those buttons.

void Update()
{

}

Then we make another function that we call from update.

public void ChangeWeaponWithNumbers()
{
}

So in this function we need to loop throught our keys and check if we press 1st key in our index it will spawn 1st index in our inventory.

public void ChangeWeaponWithNumbers()
{
	//loop throught our keycode list
	for(int i =0;i<numberss.Count;i++)
	{
		//check if whichever index keycode we have pressed
		if(Input.GetKeyDown(numberss[i]))
		{
			//set our currentWeapon to be same in our inventory as it is in our keycode list.
			currentWeapon = myWeaponList[i];
			// call weapon spawn function with that weapon.
			ChangeWeapon(myWeaponList[i]);
		}
	}
}

Now we call this function in our update function. Game goes throught Update function every frame. So for example if our fps is 60 it will go throught update fucntion 60 times in a second.

void Update()
{
	ChangeWeaponWithNumbers();
}

Okay now we notice that we get errors if we press key 3 and so on. Thats becouse there is no elements in our inventory at that point. To fix the error add empty elements to our weaponlist to have same amount as we have keycodes in our keycode list. And then we need to make one check aswell.

public void ChangeWeaponWithNumbers()
{
	//loop throught our keycode list
	for(int i =0;i<numberss.Count;i++)
	{
		//check if there is something before we instantiate it
		if(myWeaponList[i] != null)
		{
			//check if whichever index keycode we have pressed
			if(Input.GetKeyDown(numberss[i]))
			{
				//set our currentWeapon to be same in our inventory as it is in our keycode list.
				currentWeapon = myWeaponList[i];
				// call weapon spawn function with that weapon.
				ChangeWeapon(myWeaponList[i]);
			}
		}
	}
}

Let’s leave it here for now. Next time we will add a way to drop weapons from our inventory and add weapons to it. And I will propably go throught some basic networking in Unity and some other things in the future.

InventorytTutorial

UI, HCI and HMI

UI = User interface, HCI = Human-computer interaction, HMI = Human-machine interaction.

UI is a field of HMI/HCI it’s the thing that user uses to interact with computer/machine. With UI user can do input to give command to computer or machine like a car, which would be turning a wheel for example or hitting a brake and computer/machine will provide output based on your input, like in code if I type: Console.WriteLine(“Hello World!”); and run it computer will put output: “Hello World!” to console or if I hit a brake car will start to slow down for example or even when I’m opening a door with doorknob I’m using an interface.

Usually with UI people mean graphical interface of a program or lets say a game.

Like in a game if you click spell icon from interface character does that spell for example.

In desingning an interface for a game for example you need to take in account a few things. It needs to be simple for people to fast learn and use it, and it helps if it is customable so the player/user can custom it the way he likes. Then when you have done your interface let people test it, then analyze the data and do the fixes needed and repeat untill it’s good.

HCI means interaction between user and computer and studying, designing, implementing and developing new interfaces or ways to interact with computer. The ultimate goal of HCI is to minimize barrier between user and computer.

HMI is almost same as HCI, but it’s a lot older word and it’s related to machines aswell, like lets say cars. In car you choose direction it goes with wheel and you choose your speed with accelerator and brake. In HMI desing the goals are same as in HCI: make machine easier to use, and reduce barrier with machine and user.

So ultimately UI is just a way to tell computer/sofware/machine/game what you want it to do, and when you desing interface you want it to be as easy to use as possible.


Simple (audio)dialogue scrip on Unity

So I made simple and really easy to use dialoque script that allows you to make simple and small conversations with npc or yourself. There is also audio which is added to list so you can play audio same time with correct text on screen.

using UnityEngine;
using System.Collections;
using System.Collections.Generic;
using System.Xml;
using System.Text;
using System.IO;

public class Dialog : MonoBehaviour
{
//distance between npc and player
public float distance;
public Transform player;
public bool activez;
//number that decides which text is shown and which is not.
public int count;
//dictionary where we store our text
Dictionary<int, string> test = new Dictionary<int, string>();
//List for Audio files. Drag and drop files to here in inspector
public List<AudioClip> audios = new List<AudioClip>();
// Use this for initialization
void Start()
{

//all text is stored in dictionary and accessible with numbers
test.Add(0, "Text 1");
test.Add(1, "Text 2");
test.Add(2, "Text 3");
test.Add(3, "Text 4");
test.Add(4, "Text 5");
test.Add(5, "Text 6");
test.Add(6, "Text 7");
test.Add(7, "Text 8");
test.Add(8, "Text 9");
test.Add(9, "Text 10");
test.Add(10, "Text 11");
test.Add(11, "Text 12");
test.Add(12, "Text 13");
test.Add(13, "Text 14");
test.Add(14, "Text 15");
test.Add(15, "Text 16");
test.Add(16, "Text 17");
test.Add(17, "Text 18");
test.Add(18, "Text 19");
}

// Update is called once per frame
void Update()
{
//if player is close enought npc we "activate" script
distance = (transform.position - player.position).magnitude;
if (distance < 5)
{
activez = true;
}
else
{
activez = false;
}

}
void OnGUI()
{
//if script is "actived"
if(activez == true)
{
// if count is 0 which is the start, do gui button that changes count to 1 if pressed to start "conversation"
if(count == 0)
{
if(GUI.Button(new Rect(Screen.width/2,Screen.height/2,250,50),"Hey there do you understand me?"))
{
//Play audio file "element" 0 in list
audio.clip = audios[0];
audio.Play();
//make count to 1
count = 1;
}
}
//if count = 1 we make 3 more gui buttons wich set count to 2,3,4
if(count == 1)
{
GUI.Label(new Rect(10,Screen.height/2,500,100),test[4]);
if(GUI.Button(new Rect(Screen.width/2,Screen.height/2-100,250,50),test[5]))
{
//Play anotehr audio file from audio list
audio.clip = audios[1];
audio.Play();
//make count to 2
count = 2;
}
if(GUI.Button(new Rect(Screen.width/2,Screen.height/2-200,500,50),test[6]))
{
audio.clip = audios[2];
audio.Play();
count = 3;
}
if(GUI.Button(new Rect(Screen.width/2,Screen.height/2-300,250,50),test[7]))
{
audio.clip = audios[3];
audio.Play();
count = 4;
}
}
//checks if count is 2 ,3 ,4 and gives us text and back button,
//wich takes count back to earlier number, so you can choose again
if(count == 2)
{
GUI.Label(new Rect(10,Screen.height/2,500,100),test[8]);
if(GUI.Button(new Rect(Screen.width/2,Screen.height/2-300,250,50),test[12]))
{
count = 1;
}
}
if(count == 3)
{
GUI.Label(new Rect(10,Screen.height/2,500,100),test[9]);
if(GUI.Button(new Rect(Screen.width/2,Screen.height/2-300,250,50),test[12]))
{
count = 1;
}
}
if(count == 4)
{
GUI.Label(new Rect(10,Screen.height/2,500,100),test[10]);
//if player presses this button we move conversation to count 5
if(GUI.Button(new Rect(Screen.width/2,Screen.height/2-300,250,50),test[13]))
{
count = 5;
}
if(GUI.Button(new Rect(Screen.width/2,Screen.height/2-200,250,50),test[12]))
{
count = 1;
}
}
}
//if count = 5 button will spawn if player clicks it,
//it will start coroutine lol
if(count == 5)
{
if(GUI.Button(new Rect(Screen.width/2,Screen.height/2-200,250,50),test[14]))
{
count = 6;
StartCoroutine("lol");
}
}
if(count == 7)
{
GUI.Label(new Rect(Screen.width/2,Screen.height/2-200,250,50),test[15]);
}
if(count == 8)
{
GUI.Label(new Rect(10,Screen.height/2,500,100),test[16]);
}
if(count == 9)
{
GUI.Label(new Rect(Screen.width/2,Screen.height/2-200,250,50),test[17]);
}
if(count == 10)
{
GUI.Label(new Rect(Screen.height/2 +100,Screen.height/2-50,500,100),test[18]);
}
}
//waits several seconds and then shows different texts and plays audios
IEnumerator lol()
{
audio.clip = audios[4];
audio.Play();
count = 7;
yield return new WaitForSeconds(7);
audio.clip = audios[5];
audio.Play();
count = 8;
yield return new WaitForSeconds(5);
audio.clip = audios[6];
audio.Play();
count = 9;
yield return new WaitForSeconds(7);
audio.clip = audios[7];
audio.Play();
count = 10;
yield return new WaitForSeconds(2);
count = 11;
}
}

Unity thirdperson controller, camera and animation scripts

I wanted to make 3rd person controller and got it to work pretty nicely.

So first of all. What do we need? Well we need a camera ofc and somekind of 3d model to animate ( you will need to make/download your own). Ground and some light should be in the scene too.

First lets do the the script that moves the player.

We need to attach RigidBody and collider to our model. I prefer using capsule collider altought you have to scale it to fit your character. Set rigidbody rotation to freeze from inspector and last remove gravity from rigidbody. We will also have to go to Edit->Project settings->Input->Horizontal and set our negative and positive alt buttons to q and e instead of a and d. Script will make character move forward/backward/left/right, run, turn left/right and jump.

Then to the script.

using UnityEngine;
using System.Collections;

public class thirdperson : MonoBehaviour {

//Walking speed
public float speed = 6;
//Running speed of our character
public float runSpeed = 9;
//Speed of how fast our character turns
public float rotateSpeed = 90;
// is character grounded
public bool grounded;
//is character jumping
public bool isJumping;
// which way our character is moving. Defaul value is zero
public Vector3 moveDirection = Vector3.zero;

void Start()
{
//in start we set grounded and isjumping to false
grounded = false;
isJumping = false;
}

void Update ()
{
//we set rigidbodys velocity to 0
rigidbody.velocity = Vector3.zero;
//checks if there is anything under character if is set grounded to true if not set it to false
if(Physics.Raycast(transform.GetChild(0).position,Vector3.down,transform.localScale.y/2))
{
grounded = true;
}
else
{
grounded = false;
}
//checks if we are grounded so we cant jump again in air and if we press jump button. else we are not jumping so isjumping = false
if(Input.GetKeyDown(KeyCode.Space) &amp;&amp; grounded == true)
{
//Starts jump ienumerator
StartCoroutine("jump");
}
else
{
isJumping = false;
}
//If we press "d" we rotate our player as long as "d" is pressed down and if we press "a" rotate other way
if(Input.GetKey(KeyCode.D))
{
transform.Rotate(Vector3.up, Mathf.Clamp(180f * Time.deltaTime, 0f, 360f));
}
if(Input.GetKey(KeyCode.A))
{
transform.Rotate(Vector3.up, -Mathf.Clamp(180f * Time.deltaTime, 0f, 360f));
}
//set out movedirection equal to our horizontal and vertical axis and out transform direction to those axis.
moveDirection = new Vector3(Input.GetAxis("Horizontal"),0,Input.GetAxis("Vertical"));
moveDirection = transform.TransformDirection(moveDirection);

// checks if we push left shift if yes it multiplies our movedirection speed with runspeed variable if not we go with normal speed
if(Input.GetKey(KeyCode.LeftShift))
{
moveDirection *= runSpeed;
}
else
{
moveDirection *= speed;
}
//Checks if our character is not jumping and its not grounded. then moves character down "gravity"
if(isJumping == false &amp;&amp; grounded == false)
{
transform.Translate(Vector3.down * 3 * Time.deltaTime);
}
//we set rigidbodys velocity to our movedirection wich contains speed and rotation of our character
rigidbody.velocity = moveDirection;

}

IEnumerator jump()
{
//First we ste player to jumping so gravity dsnt affect it
isJumping = true;
//We make loop that moves our player up multiple times if its not in touch with anything in front of it
for(int i = 0; i &lt; 30; i++)
{
if(Physics.Raycast(transform.position,Vector3.forward,transform.localScale.y/2 + 0.5f))
{
break;
}
else
{
transform.Translate(Vector3.up * 15 * Time.deltaTime,Space.World);
}
yield return null;
}
//last we set jumping back to false
isJumping = false;
}
}

Then we need third person camera, so we can look our character. I added 1st person mode aswell so player can look enviroment better. We make a camera and attach this script to it. To make script to work we will need to drag & drop our character into the player field in inspector. Camera will be moving depending on your mouse position and will never go under/behind anything. You can also increase distance between camera and player with mouse scroll wheel. Character will also change its X rotation to same as cameras X rotation if you press right mouse button.

Here is the code :

using UnityEngine;
using System.Collections;

public class cameraorbit : MonoBehaviour {
//This camera
public Camera mainCamera;
//Our character
public Transform player;
//distance between character and camera
public float distance = 5.0f;
//x and y position of camera
float x = 0.0f;
float y = 0.0f;
//x and y side speed, how fast your camera moves in x way and in y way
public float xSpeed = 120.0f;
public float ySpeed = 120.0f;
//Minium and maximum distance between player and camera
public float distanceMin = 0.5f;
public float distanceMax = 15f;
//checks if first person mode is on
private bool click = false;
//stores cameras distance from player
private float curDist = 0;

private void Start()
{
//make variable from our euler angles
Vector3 angles = transform.eulerAngles;
//and store y and x angles to different values
x = angles.y;
y = angles.x;
//sets this camera to main camera
mainCamera = Camera.main;
}

private void LateUpdate ()
{
//gets mouse movement x and y and multiplies them with speeds and moves camera with them
x += Input.GetAxis("Mouse X") * xSpeed * distance * 0.02f;
y -= Input.GetAxis("Mouse Y") * ySpeed * 0.02f;
//set rotation
Quaternion rotation = Quaternion.Euler(y, x, 0);
//changes distance between max and min distancy by mouse scroll
distance = Mathf.Clamp(distance - Input.GetAxis("Mouse ScrollWheel")*5, distanceMin, distanceMax);
//negative distance of camera
Vector3 negDistance = new Vector3(0.0f, 0.0f, -distance);
//cameras postion
Vector3 position = rotation * negDistance + player.position;
//rotation and position of our camera to different variables
transform.rotation = rotation;
transform.position = position;
//cameras x rotation
float cameraX = transform.rotation.x;
//checks if right mouse button is pushed
if(Input.GetMouseButton(1))
{
//sets CHARACTERS x rotation to match cameras x rotation
player.eulerAngles = new Vector3(cameraX,transform.eulerAngles.y,transform.eulerAngles.z);
}
//checks if middle mouse button is pushed down
if(Input.GetMouseButtonDown(2))
{
//if middle mouse button is pressed 1st time set click to true and camera in front of player and save cameras position before mmb.
//if mmb is pressed again set camera back to it's position before we clicked mmb 1st time and set click to false
if(click == false)
{
click = true;
curDist = distance;
distance = distance - distance - 1;
}
else
{
distance = curDist;
click = false;
}
}
//store raycast hit
RaycastHit hit;
//if camera detects something behind or under it move camera to hitpoint so it doesn't go throught wall/floor
if(Physics.Raycast(player.position,(transform.position - player.position).normalized,out hit,(distance <= 0 ? -distance : distance)))
{
transform.position = hit.point;
}
}
}

Then the animations. I’m no good in doing animations so I had a friend of mine to do them for me. Blender is the easiest tool to get into animating 3d models,
but I’m not going into the details how to do it (to get animation script to work you will need to have your own animations done and added to character model), but more into how to make animations play in script and to do it so they play nice and in correct order.

I had some problems in making first person mode to work well so I made empty game object and made that “the player” and character model its child,
so I could change characters center point more up. That is the reason why I’m calling my gameobjects 1st child’s animations instead of players animation as animation is
attached in the model not the empty gameobject.

I’m using a lot of “if”s which is propably not the best way to do it, but I got it to work anyway.  I made different script instead of inserting animations into my movement script just to make it easier to read. Here is what I did in script.

using UnityEngine;
using System.Collections;

public class Animations : MonoBehaviour {


void Start ()
{
//calls this objects 1st childs animation and changes that animations speed. 1f is the curent speed of animation.
//You can change animations speed by what looks best
transform.GetChild(0).animation["Idle"].speed=0.8f;
//sets animations mode to loop so it continues smoothly if it is repeating itself
transform.GetChild(0).animation["Idle"].wrapMode = WrapMode.Loop;

transform.GetChild(0).animation["Walk"].speed=1;
transform.GetChild(0).animation["Walk"].wrapMode = WrapMode.Loop;

transform.GetChild(0).animation["JumpForward"].speed=2.5f;

transform.GetChild(0).animation["Run"].speed=1.5f;
transform.GetChild(0).animation["Run"].wrapMode = WrapMode.Loop;

transform.GetChild(0).animation["Landing"].speed=1;
//sets so this animation only plays once when it playes and doesnt loop
transform.GetChild(0).animation["Landing"].wrapMode = WrapMode.Once;


}
//is our character landing?
bool landing = false;

void Update () {
//sets idle to true
bool idle = true;
//we only do otehr animations if jump animation is not playing
if(!transform.GetChild(0).animation.IsPlaying("JumpForward"))
{
if(transform.GetComponent<thirdperson>().grounded)
{
//checks from anotehr script if we are in ground and we are landing and sets landing to false and plays landing animation
if(transform.GetComponent<thirdperson>().grounded  && landing == true)
{
landing = false;
transform.GetChild(0).animation.Play("Landing");
}
//checks if we press any movement keys and sets idle to false as we are moving and not doing idle animation
if(Input.GetKey(KeyCode.W) || Input.GetKey(KeyCode.S) || Input.GetKey(KeyCode.A) || Input.GetKey(KeyCode.D) || Input.GetKey(KeyCode.Q) || Input.GetKey(KeyCode.E))
{
idle = false;
//checks if we press left shift with movement keys and plays running animation else it playes walking animation
if(Input.GetKey(KeyCode.LeftShift) && transform.GetChild(0).animation.IsPlaying("Run") == false)
{   //crossfade makes animation changing smooth
transform.GetChild(0).animation.CrossFade("Run",1f);
}
else if(transform.GetChild(0).animation.IsPlaying("Walk") == false && !Input.GetKey(KeyCode.LeftShift))
{
transform.GetChild(0).animation.CrossFade("Walk",1f);
}
}


//checks if we press space(jump) and sets idle to false and landing to true and plays jump animation
if(Input.GetKey(KeyCode.Space))
{
idle = false;
landing = true;
transform.GetChild(0).animation.CrossFade("JumpForward",1f);
}
//if idle is true aka no otehr animations are playing and idle is not playing already plays idle animation
if(idle == true && !transform.GetChild(0).animation.IsPlaying("Idle"))
{
transform.GetChild(0).animation.CrossFade("Idle",1f);
}


}
}
}
}


Here is a few Screen shots how it looked in my project.

Spacemanpic1

Character running and playing running animation, camera next to character.

Spacemanpic2

Camera behind, character playing idle animation.

Spacemanpic3

Character jumping, camera behind, playing jump animation

Spacemanpic4

Camera infront under character, playing idle animation, looking up with camera.

Thank you for reading. I hope this helps someone. And again as I’m still a student so if you have any better ways of doing something I’m all ears. 🙂


Unity Basic 2d platformer without RigidBody

I wanted to do 2d platformer ( super mario style) without using unitys own rigidbody. So for collision detection I used Raycast and LineCast.
First make a cube, put it to 0x,0y,0z and attach camera to it. Then set projection to orthographic and scale size how much you want, I used 13. Then make a floor from cube. Make sure that everything you add to the scene has same Z value on their transform.

Movement and Collision detection

In script basically we make player to raycast and look if there is anything under, infront or back of it and if there is, we either disable movementkeys so player can’t go throught walls or we make sure that our player doesn’t walk throught objects. In this script you can jump throught objects from under it. It’s working as intended, becouse I wanted that kind of behavior in my game.

Here is player movement/collision detection script in C#.

using UnityEngine;
using System.Collections;

public class playermovement : MonoBehaviour {
        /*our speeds*/
		public int walkSpeed = 10;
		public int runSpeed = 20;
		public int jumpSpeed = 15;
		public int fallingSpeed = 3;

       /*isAir = Is player in air?*/
		public bool inAir;
       /*Is right/left arrowkey useable?*/
		public bool rightArrowKey;
		public bool leftArrowKey;

	public void Start()
		{
		Time.timeScale = 0.5f;
/*In start we set inAir to false and our keys to useable*/
		inAir = false;
		rightArrowKey = true;
		leftArrowKey = true;
		}
	public void Update () {
/*Check if Right arrow key is pressed and its useable*/
		if(Input.GetKey(KeyCode.RightArrow) && rightArrowKey == true)
			{       /*Checks if shift is pressed at the same time then it moves * runSpeed instead of walkSpeed. If not it will move by walkspeed*/
				if(Input.GetKey(KeyCode.LeftShift))
				{
					transform.Translate(Vector3.right * runSpeed * Time.deltaTime);
				}
				else
				{
					transform.Translate(Vector3.right * walkSpeed * Time.deltaTime);
				}

			}
/*Same to left arrow key and movement*/
		if(Input.GetKey(KeyCode.LeftArrow) && leftArrowKey == true)
			{
				if(Input.GetKey(KeyCode.LeftShift))
				{transform.Translate(Vector3.left * runSpeed * Time.deltaTime);
				}
				else
				{
					transform.Translate(Vector3.left * walkSpeed * Time.deltaTime);
				}
			}
/*Checks if space is pressed*/
	if(Input.GetKey(KeyCode.Space) && inAir == false)
		{
/*moves player up * jumpSpeed*/
                transform.Translate(Vector3.up * jumpSpeed * Time.deltaTime);
/*Starts Ienumerator jump*/
		StartCoroutine("jump");
		}
/*Check if player collides anything under it*/
     if (Physics.Raycast(transform.position,Vector3.down,transform.localScale.y / 2) || Physics.Raycast(transform.position - new Vector3(transform.localScale.x /2,0,0),Vector3.down,transform.localScale.y / 2) || Physics.Raycast(transform.position + new Vector3(transform.localScale.x / 2,0,0),Vector3.down,transform.localScale.y / 2))
		{
/*inAir is then set to false*/
			inAir = false;

		}
/*if raycast dsnt collide anything under player it must be in ground so we set it to start falling down*/
		else
		{
			walkSpeed = 10;
			runSpeed = 15;
			fallingSpeed = 15;
			transform.Translate(Vector3.down * fallingSpeed * Time.deltaTime);
		}
/*checks if there is anything infront of player and disables right arrow key so player cant move throught objects*/
		if (Physics.Raycast(transform.position,Vector3.right,transform.localScale.y /2))
		{
			//Debug.Log ("something infront of player");
			rightArrowKey = false;

		}
/*If nothing is infront of player you can continue moving on*/
		else
		{
			rightArrowKey = true;
		}
/*Same to left side*/
		if (Physics.Raycast(transform.position,Vector3.left,transform.localScale.y /2))
		{
			//Debug.Log ("something infront of player");
			leftArrowKey = false;

		}
		else
		{
			leftArrowKey = true;
		}

	}
/*Coroutine that we start if we jump. It will wait one millisecond and then it realizes its in air and starts falling down, this is done so it doesn't start to fall down same time as it jumps*/
	IEnumerator jump()
	{
		yield return new WaitForSeconds(0.1f);
		inAir = true;
	}
}

(Green is player)
2dgame

Next step simple enemies

Next we need to make enemies. I decided to make really simple enemies which run towards left untill they detect object infront and then they check, if object is player, if it is, game ends if it’s not they turn around and go to other way. If enemy doesn’t find anything under it, it will start to fall down. Also I made that if enemy finds anything above it , enemy will be deleted out from scene. So it works like goombas in supermario.

Enemy Script:

sing UnityEngine;
using System.Collections;

public class enemy : MonoBehaviour {

public bool move;
     void Start()
        {
        move = false;
        }
	void Update () {
/*Stores details about raycasthit*/
		RaycastHit hit;
/*If raycast finds anything above enemy destroy the enemy*/
	if (Physics.Raycast(transform.position,Vector3.up,transform.localScale.y / 2))
		{
			Destroy(gameObject);
		}
/*If raycast finds anything infront of enemy and if that object has tag wich is "Player" end the game. If it's not the player that is infront of enemy it will just turn around.*/
	if(Physics.Raycast(transform.position,Vector3.left,out hit,transform.localScale.x /2))
		{
			if(hit.collider.gameObject.tag == "Player")
			{
			Application.LoadLevel("Your lvl here");
			}
		}
/*Same to other side*/
	if(Physics.Raycast(transform.position,Vector3.right,out hit,transform.localScale.x /2))
		{
			if(hit.collider.gameObject.tag == "Player")
			{
			Application.LoadLevel("Your lvl here");
			}
		}
/*if enemy finds anything right side of it we set boolean move to false*/
if (Physics.Raycast(transform.position,Vector3.right,transform.localScale.y /2))
		{
			move = false;
		}
/*if enemy finds anything from left side of it we set boolean move to true*/
	else if(Physics.Raycast(transform.position,Vector3.left,transform.localScale.y /2))
		{
			move = true;
		}
/*if boolean move = true our enemy starts to move to right*/
	if(move == true)
		{
			transform.Translate(Vector3.right * 7 * Time.deltaTime);
		}
/*if boolean move = false our enemy starts to move to left*/
	if(move == false)
		{
			transform.Translate(Vector3.left * 7 * Time.deltaTime);
		}
/*if enemy finds anything under it do nothing*/
	if (Physics.Raycast(transform.position,Vector3.down,transform.localScale.y / 2) || Physics.Raycast(transform.position - new Vector3(transform.localScale.x / 2,0,0),Vector3.down,transform.localScale.y / 2) || Physics.Raycast(transform.position + new Vector3(transform.localScale.x / 2,0,0),Vector3.down,transform.localScale.y / 2))
		{

		}
/*if enemy doesn't find anything under it, it will start to fall down*/
		else
		{
			transform.Translate(Vector3.down * 15 * Time.deltaTime);
		}
	}

}

Then we can make simple script that spawns enemies on certain spots. We have a timer that starts to decrease and when it hits 0 it spawns an enemy on spot and then timer goes back to start. To make this work you need to drag one enemy from your hierarchy to your assests folder and it will become prefab. Then in inspector insert this code to player or anything that doesn’t get removed from scene. In inspector drag your enemy prefab from assest folder to None GameObject slot on your code attached to the player or anywhere you attached it.

using UnityEngine;
using System.Collections;

public class enemySpawn : MonoBehaviour {
/* Our prefab*/
	public GameObject prefab;
/*Our timer*/
	public float timer = 2;

	void Update () {
/*Checks if timer is 0*/
		if(timer == 0)
		{
/*Spawns enemy from prefab to spot 126x,78y,0z*/
			Instantiate(prefab,new Vector3(126,78,0),Quaternion.identity);
/* You can add multiple spots here*/
/*Sets timer back to 2*/
			timer = 2;
		}
/*Decreases timer by deltatime*/
		timer -= Time.deltaTime;
/*Checks if timer is below 0 and sets it back to 0 if it is*/
		if(timer <= 0)
		{
			timer = 0;
		}

	}
}

(Green Player, Yellow Enemies)
2dgame2

Next we need something that kills player and deletes every enemy that drops down from our lvl.

I made it by using linecast and attached it to a cube that I scaled under the scene. If anything hits that line it will be deleted or if player hits it game will start again.

Code:

using UnityEngine;
using System.Collections;

public class death : MonoBehaviour {

	void Update () {
		/*stores raycast hit info*/
		RaycastHit hit;
		/* makes line equal to the object you make and checks if anything hits it*/
		if(Physics.Linecast(transform.position + new Vector3(-transform.localScale.x / 2,transform.localScale.y / 2,0),
			transform.position + new Vector3(transform.localScale.x / 2,transform.localScale.y / 2,0),out hit))
		{
/*Checks if object that hits line has playermovenet script attached to it*/
			if(GetComponent<playermovement>())
			{
/*if yes restart scene*/
				Application.LoadLevel("Your lvl here");
			}
/*if not destroy it. Enemies will not have playermovement script atatched to them so they will be destroyed if they hit the line*/
			Destroy(hit.collider.gameObject);
		}
	}
}

(Player, Enemy and yellow line of death)
2dgame3

Now last thing we need is a goal.

We need to make object that checks if it finds anything infront of it that has tagg “Player”. If yes level is completed. I made REALLY simple script to do that.

using UnityEngine;
using System.Collections;

public class goal : MonoBehaviour {

	void Update () {
	//Stores raycast hit info
		RaycastHit hit;
/* checks if there is something in let side of object*/
		if(Physics.Raycast(transform.position,Vector3.left,out hit,transform.localScale.x /2))
		{
/*checks if it has tag "Player" in it*/
			if(hit.collider.gameObject.tag == "Player")
			{
/*if yes load your victory screen here or something you want*/
			print("Victory);
			}
		}
	}
}

(Player left side smaller green cube and goal rigth side bigger cube)
2dgame4

I Hope, this helps someone, who wants to do a simple 2d platformer. I’m just a student myself so, if you find some horrible bugs or better ways of doing certain things, please let me know 🙂

Lightning Strike on Unity 3d Using Line renderer.

What do we need to do it?

We need to use unity build in feature called LineRenderer wich draws line between two objects.

We set it to draw line between our 1st person controller and its target in this case red cube in middle. Then we make randomised path to our line.  Then we make loop when we push mouse button 0 aka right mouse click 1st person controller will shoot lightning on red cube. Ofc to make line look like lighting you will have to use texture and change color. I decided to use unitys own textures and selected blue color for my lightning. You can add texture and color from inspector.

 Full code:

var targetObject : GameObject;
private var lineRenderer : LineRenderer;
var asd : int = 3;
function Start()
{

    lineRenderer = GetComponent(LineRenderer);
}

function Update ()
{
//Check if we press right mouse button
	if(Input.GetKey(KeyCode.Mouse0))
	{
//Enables line renderer
		lineRenderer.enabled = true;
 //Sets starting position to players position
			lineRenderer.SetPosition(0,this.transform.localPosition);
//Loop that moves line to "random directions"
	    	for(var i:int=1;i<4;i++)
	    	 {
	        	var pos = Vector3.Lerp(this.transform.localPosition,targetObject.transform.localPosition,i/4.0f);

                        //randomises lines position
	        	pos.x += Random.Range(-0.4f,0.4f);
	        	pos.y += Random.Range(-0.4f,0.4f);

	        	lineRenderer.SetPosition(i,pos);
	   		}
//Lines end postion at the target
	    	lineRenderer.SetPosition(4,targetObject.transform.localPosition);
	}
    else
    {
// If we dont press right mouse button disables linerenderer
    	lineRenderer.enabled = false;

    }
}

Lightning bolt

Based on this tutorial